Attention all sushi lovers! Are you fed up with always having to pay high prices at your favorite sashimi restaurant?
Would you like to know how to make sushi rolls sushi rolls that are so good that your friends and family will be talking about for days?
You’ve come to the right place, as this article details the ultimate how-to guide on preparing sushi rolls.
Tie your apron strings and brace yourself for this culinary ride. That will leave your taste buds happily buzzing and your guests clamoring for more!
Come on and join us to find out how you can make the best sushi rolls!
Contents
What are Sushi Rolls

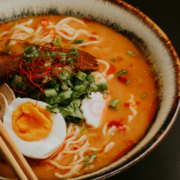
Sushi rolls are one of the top archetypical Japanese recipes that have taken over the world. These marvelous small pieces of rice, seafood, and vegetables wrapped in seaweed sheets combine diverse flavors and textures. This is what makes them unmistakable and delicious.
The sushi rolls that are now common throughout the world. However, initially, this was a technique from Southeast Asia. It was used to preserve fish by fermenting it with rice.
Did you know the Japanese borrowed this method from China as early as the 8th century and have since acquired its signature taste?
Makizushi, or sushi rolls, are of many types!
Ranging from simple ones with shapes and sizes to complexly filled ones.
A few of the most popular options include California roll, spicy tuna roll, rainbow roll, and dragon roll. Each has its uniqueness in taste and ingredients.
Benefits of Making Sushi Rolls at Home

Preparing sushi at home can be a nice and satisfactory activity. Despite it seeming intimidating at the beginning, the benefits of making this dish in the comfort of your own kitchen are worth the initial anxiety. This part will discuss the primary advantages of preparing sushi at home.
Cost-Effective
One of the major advantages of making sushi at home is that it may help you save money. The prices of sushi restaurants can be quite high, varying between $20 to $50 for a complete meal per person.
Making sushi rolls at home lets you buy the products in bulk. Therefore, with a single batch, you can prepare several servings.
It is also important to mention that eating homemade sushi will not make you pay for the service and tipping!
How exciting!
Healthier Ingredients
Making your own sushi adds an extra level of controlling the ingredients that go into your dish. we make sure to lead you to a healthy life.
Whether you want to eat fresh, high-quality seafood or go for vegetarian food, you can choose whatever you prefer. This guarantees that all the products are superior quality and shields you from doubtful ingredients.
Don’t worry, you can find those in the ready shops’ products.
Customize Your Rolls
Also, making sushi at home is very customizable, and each customization will suit your taste. With no limitations to the ingredients that can be experimented with, you are free to customize different types of fillings and toppings. You can be wild and crazy with quantities, too.
Fun Activity for All Ages
Sushi-making is also very good for families or friends to do activities together. It would be even more entertaining if the kids enjoyed getting their hands messy!
Get everyone to gather around the table and make each one of them his or her personalized rolls using their favorite ingredients; it could be a nice, fun way to spend time together and learn something new.
Suitable for Special Diets
Sushi is a great choice of food for people with dietary restrictions such as allergies or intolerances because it results in ease of preparation at home so that they can accommodate their needs better than when they order from restaurants.
You can use gluten-free soy sauce, alternatively, swap the rice you use with brown rice or cauliflower rice, and you decide on the amount of salt and sugar to add to your dish.
How to make sushi rolls – Basic Tools and Ingredients Needed

Next, we will provide detailed instructions on all the basic equipment and the ingredients for making it completely from scratch perfectly rolled sushi.
Sushi Rice:
The main ingredient to make sushi is rice. Using Japanese short-grain rice is the key to the ideal sticky consistency that is required for the ideal result. Wash the rice well to remove all starch and then cook it, following the directions on the packing label for the ratios.
Rice Vinegar:
Rice vinegar gives sushi rice the salty flavor characteristic of sushi and the finely textured shiny appearance. Seek out unseasoned rice vinegar to ensure it is void of flavors. Flavored vinegar will slightly change the taste of your sushi.
Nori Sheets:
Nori sheets are made up of very thin seaweed paper that encompasses the rice roll. Pay attention to the quality of your nori since it would also play a role in the taste and texture of your finished product.
Sushi Mat:
A makisu, or the bamboo rolling mat, helps you wrap your sushi rolls neatly without spilling the fillings on you.
Sharp Knife:
The most important thing is a good sharp knife needed to cut our perfect slices of sushi. A damaged knife will not only affect the look but also the taste and flavor of the dish.
Raw Fish/Seafood or Vegetables:
The core ingredient used in crafting sushi rolls is raw fish or seafood, like salmon, tuna, or any other. However, you can substitute them with cooked seafood or vegetables such as avocado or cucumber if you prefer a vegetarian option.
Condiments:
Soy sauce, wasabi paste, and pickled ginger are some condiments that are needed and can upgrade the flavor of your sushi rolls.
Toppings:
Mix it up with sesame seeds or chopped scallions; they have a nice texture, which makes the dish look more interesting.
Cutting Board:
A clean and sturdy cutting board is to be used in making and cutting the ingredients. It helps you to remain organized by maintaining your working space.
Bowl of Water:
Having a bowl of water next to you as you roll sushi would do well to keep your hands, the rice not sticking to them being the objective.
Step-by-Step Guide – How to make sushi rolls

For amateurs, it may seem like sushi rolling is difficult, but with appropriate tools and methods, you can roll tasty sushi right in the comfort of your home. Read these explanations, and you will master the art of sushi rolls.
Step 1: Make ready, your ingredients
Before beginning the rolling process, please ensure that all ingredients are cut, sliced, measured, and ready.
You will need the cooked and seasoned sushi rice, the fish and vegetables for filling, and all the desired toppings. It is necessary to be ready with everything before the rolling process, which prevents the rice from drying.
Step 2: Resemble Your Bamboo Only Mat
After that, position the bamboo mat on a flat surface and align the slats horizontally. Plastic wrap is a fine alternative if one doesn’t have a bamboo mat.
Just ensure that it is wide enough across to cover all the items when rolled.
Step 3: Put Nori onto the surface of the plate so that it covers it partially
First, take one available nori (seaweed) sheet and place it shiny side down on the bamboo mat. The course side is to face upwards.
Step 4: Scoot up the rice onto a nori sheet with a spatula.
Moisten the hands of one hand to avoid sticking. Take one cup of sushi rice, which is ready, and put it onto the center of a nori sheet.
Use your fingers to level the rice on the nori, covering it almost out to the edges; the top one-inch border should be left uncovered.
Step 5: The lining should be done straight
Now, arrange your fillings in the line at the center of the rice-norimaki. Be careful not to overfill this mixture. Otherwise, it will be hard to roll it further.
Step 6: Start From the First Row from Bottom
Using both hands to hold the bottom end. Then, approach the closure of the biotic or wrap plastic while you begin rolling it up. Move from the end of the bottom toward the end of the top. Pinch the ingredients with your fingers to make the roll.
Step 7: Roll With an Inclusive Process
After that, take the nori sheet by hand and use your finger to press the edge, which is without rice, to seal the sheet. It will be convenient to keep everything within a grip while slicing.
Step 8: Chop the Chunk into Bite-Size Pieces
Using a sharp knife, slice the sushi roll into equal-sized bite pieces. You can keep the knife wet to avoid sticking after each slice.
How to make sushi rolls – Choosing the Right Rice

Rice plays an essential part in traditional Japanese dishes, and you can find different grain sizes on the market. Regarding sushi, there are two types of rice that are often used: short-grain Japanese rice and medium-grain Calrose rice.
These varieties have a greater starch content than other rice types, which gives sushi its special stickiness.
While short-grain Japanese rice or Japonica rice is traditionally selected for sushi-making because of its high starch content and ability to hold shape when cooked, there are also other rice varieties that can produce good sushi.
Such rice variety has a slightly sweet flavor. It, therefore, makes it excellent to use with seafood used in sushi as they have similar flavor characteristics. Most grocery stores and Asian markets stock it under the labels of “sushi” and “Calrose” rice.
Medium-grain Calrose rice has long been a household name and especially the most favored choice by home cooks due to its price competitiveness and convenience in purchasing in supermarkets.
It has similar properties to that of short-grain Japanese rice, but the starch content is slightly less; hence, the cooked texture is softened. While you cook the special type of rice to make your sushi roll, ensure that you rinse the rice until you remove the excess surface starch.
Furthermore, while selecting between these two types of sushi rice, substitute organic and non-GMO as options if available. The main advantage of these alternatives is that they are usually natural, and taste better because they are grown with minimal use of chemicals.
How to make sushi rolls – Prepare the Fillings

Making amazing sushi at home starts with filling preparations, which is a vital step in the process. It is vital that you use the best ingredients and then prepare them in the right way to get the balance of flavors and textures you want in your sushi rolls.
Choosing the Fillings:
Start with the kind of ingredients you want to use for the filling. Sushi in the old times was made with raw food, but now you can use any ingredient that you love and suits your preference. Selected concerns are avocado, cucumber, carrots, crab meat, shrimp, smoked salmon, tofu, and cream cheese.
Preparing the Ingredients:
After you choose the fillings, it is time to cut them into thin strips. When consuming raw fish or seafood, be sure that it is fresh and of good quality.
First, rinse and peel the vegetables beforehand and then slice them into thin strips to ease the rolling process. Additionally, it is possible to briefly cook some of your fillings, like shrimp or crab meat, prior to putting them into the rolls.
Seasoning Your Fillings:
We need to add the zest of flavor to our sushi fillings. Thus, use some sauces or marinades to season them.
Soy sauce, spicy mayo, and teriyaki sauce are some of the standard ingredients that can make your filling more delicious with their dynamic taste. In addition, you could sprinkle sesame seeds or furikake (Japanese seasoning) on top for an extra bite.
Proper Placement:
While filling the sushi inside with ingredients, it is important to put them in the right strategic spots for even dispersion of flavors in every bite.
Begin by placing a small plate of rice in the center of the Nori sheet, then the filling, and spread equally towards one corner.
Adding Variety:
To add a touch of background for your sushi roll flavors and textures, you can put different types of fillings next to each other in one roll.
This makes creating different types of backgrounds and textures more effectively, resulting in a visually nice appearance.
Slicing Your Fillings:
You are just about finished when you put the fillings on the nori. Then, you roll and cut them into individual pieces. We advise using a sharp, wet blade for clean cuts and wiping it after each cut, ensuring precision and neatness.
Through this process, you can create the best fillings to make your sushi roll at home, which will be delicious and attractive. Don’t be afraid to surprise yourself with imaginative fillings and find the best sushi roll flavor.
How to make sushi rolls – Rolling Techniques

Mastering the rolling technique is the key to creating perfectly formed and tightly rolled sushi. A great sushi roll depends not only on the quality and freshness of the ingredients but also on how well it is rolled.
In this section, we will cover three different types of rolling techniques – traditional, inside-out, and hand-rolled – that will help you achieve professional-looking sushi rolls at home.
Traditional Rolling Technique:
Start by laying a sheet of nori (seaweed) shiny side down on top of a bamboo mat or sheet of plastic wrap.
You need to spread a thin layer of rice over the nori, leaving about an inch border at one end. Next, line up your desired fillings in a straight line near the bottom edge of the rice-covered nori.
Using your thumbs and index fingers, carefully lift the edge of the mat closest to you while using your other fingers to hold the filling ingredients firmly in place.
Begin rolling away from yourself with even pressure until you reach the end. Shifting it into a cylinder before releasing it from the mat requires slight pressure.
Inside-Out Rolling Technique:
This technique may seem daunting at first, but with a little practice, you will be able to master it in no time! Start by placing a sheet of plastic wrap over your bamboo mat and then lay out a sheet of nori shiny side down on top.
With your lightly wet hands, spread seasoned rice over ¾ portion of nori evenly and pat gently so they stick together without too much liquid oozing out when pressed while wrapping It around for shaping later.
Next comes flipping over post-filling preparation – flip over the whole combo – using both hands, holding each longer end first quickly yet gently, ensuring proper sticking together after unfolding slightly.
As before, distribute fillings sparingly length-wise so that when rolling, it can make the skinny cylindrical filling as covered still feel flimsy without visible gaps in-between its rice till about two-thirds is filled up finally.
If rice overlaps at both ends so much pre-tucking can occur to check filling and begin rolling snugly before forming the last couple of inches into a perfectly shaped roll.
Hand-Rolled Technique:
This is the most challenging but also the most satisfying of all the rolling methods. Start by placing a sheet of nori on a work surface, shiny side down.
Moisten your hands with water and grab some seasoned rice; spread it out evenly over half of the sheet, leaving an inch border along one edge.
Add your desired fillings in a thin line along the center of the rice-covered sheet.
Using your thumbs and index fingers, start shaping and compacting your sushi as you gradually gather up the roll nearest to you away from yourself while preserving interior ingredients intact efficiently throughout the process –
add gentle pressure as rolling pulls tight. Yet creates thicker sushi widthwise when breaking even space into forming constantly.
Hopefully we gave you a good guide to how to make sushi rolls? Do you have more to add? Why not let us know in the comment section below.
Also read